Sole or shared custody: How to create a custody calendar?

Coparenting calendar

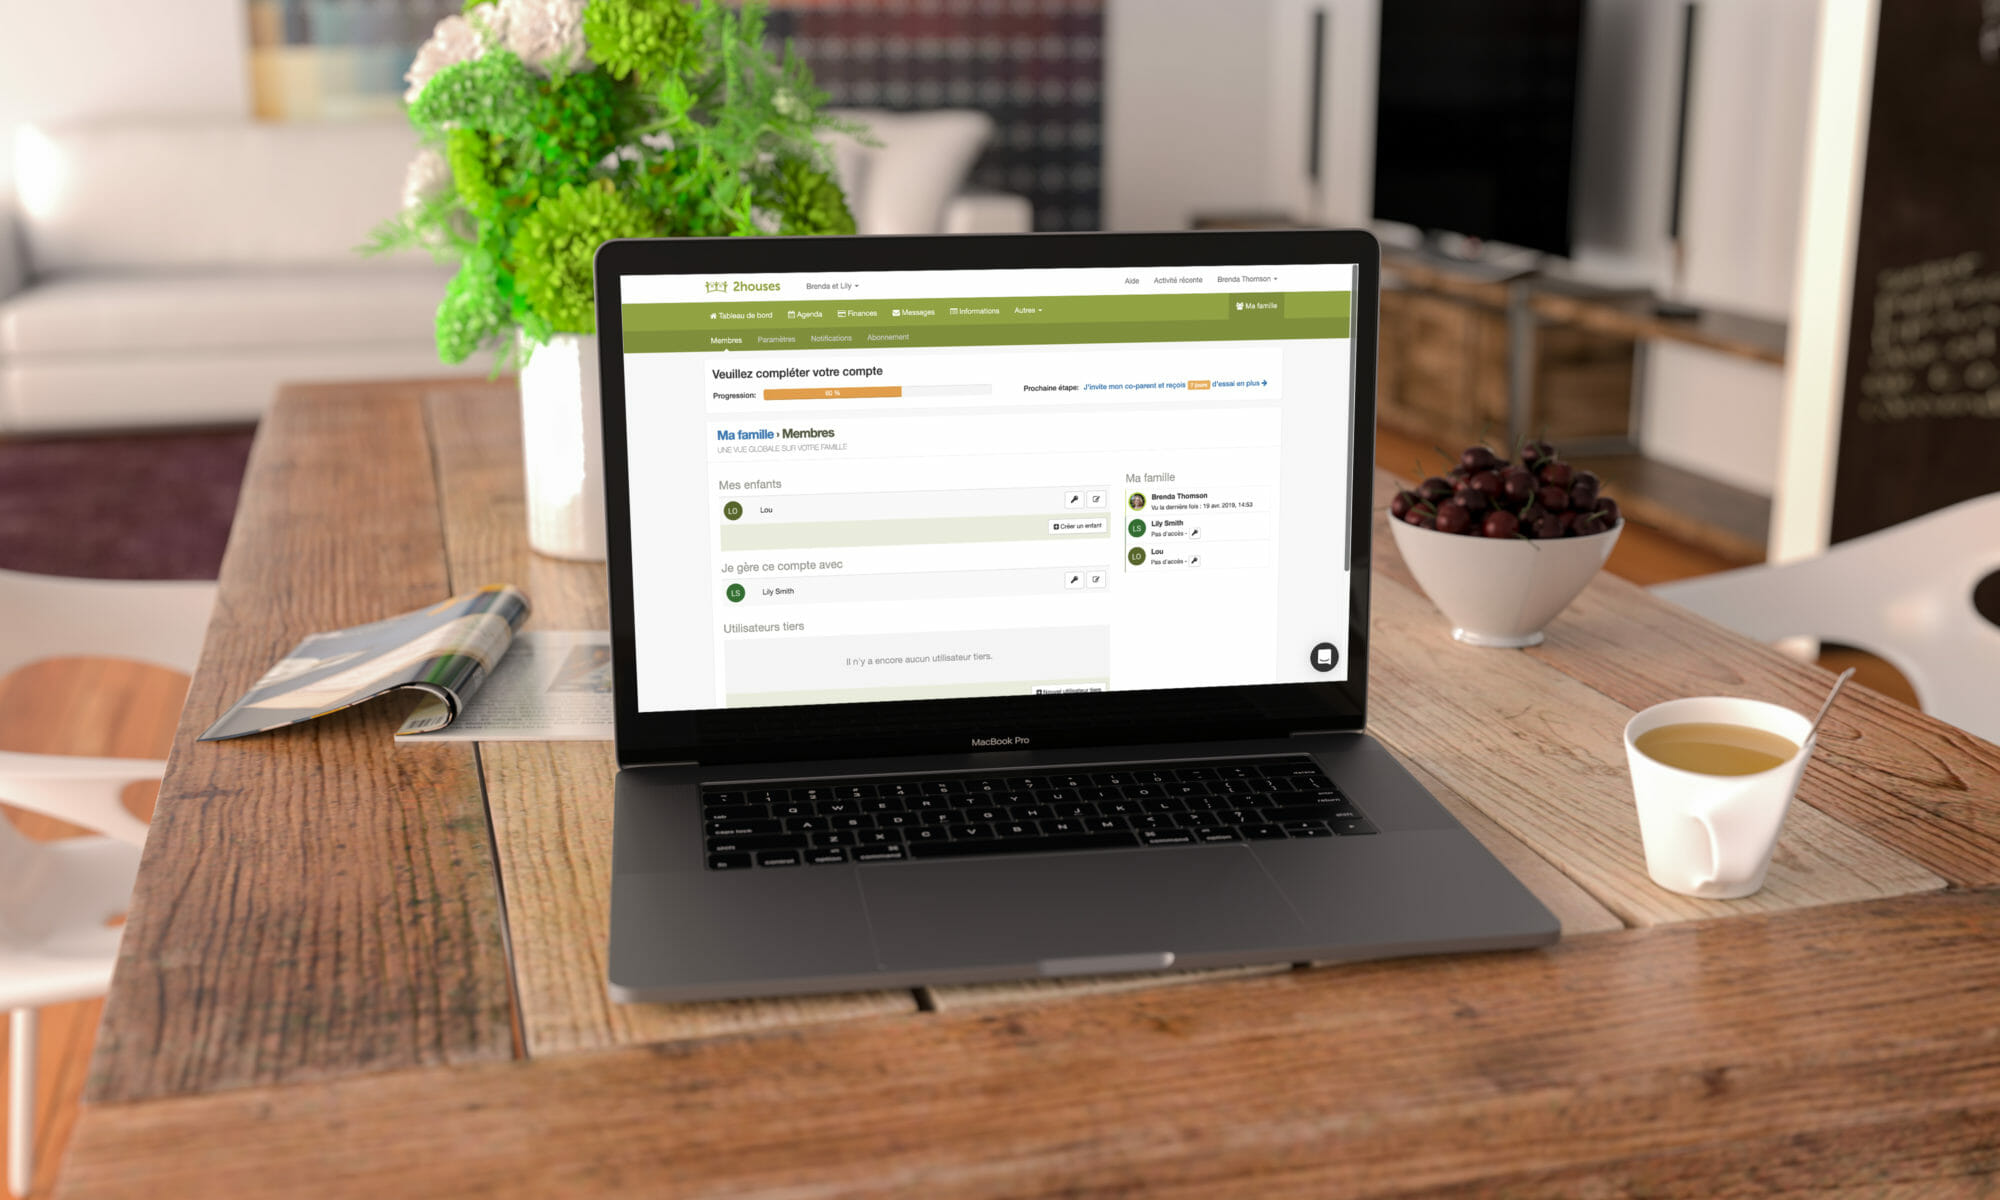
Custody calendar is one of 2houses’s hottest functions! Whether you have sole custody or shared custody, every other weekend, a week, two or three. Whatever it is, it is you who makes the plans, and 2houses can help you from the beginning to the end. We will here create a custom custody calendar.

To create your first custody calendar, just follow these steps:

1) First, click on “Calendar” on the upper menu, then “Parenting schedules“. Finally, click on “Create your first parenting schedule“:Create a calendar


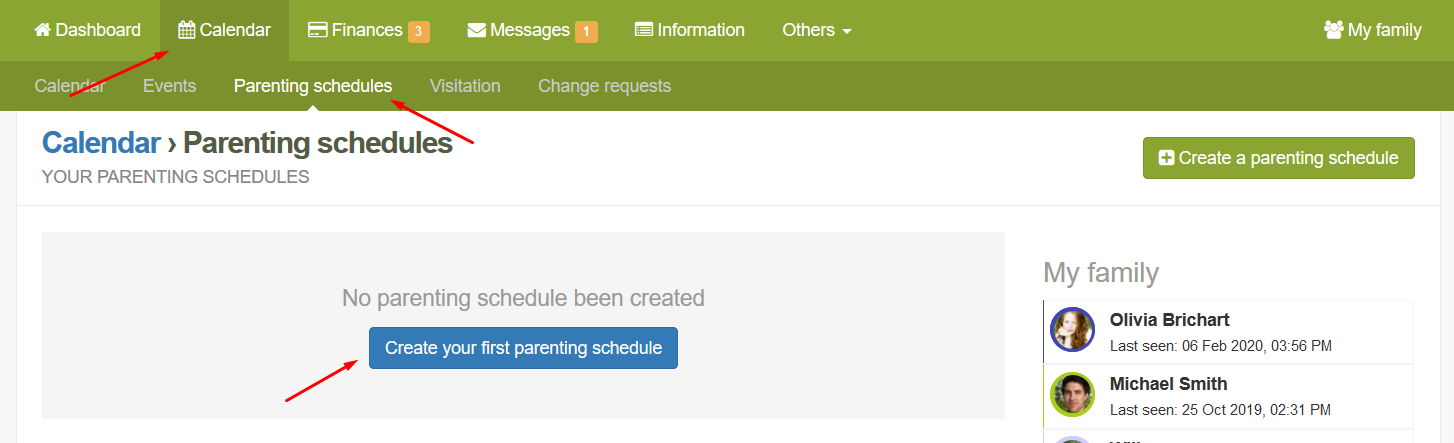
2) Now, select children concerned by the custody calendar:Custody calendar


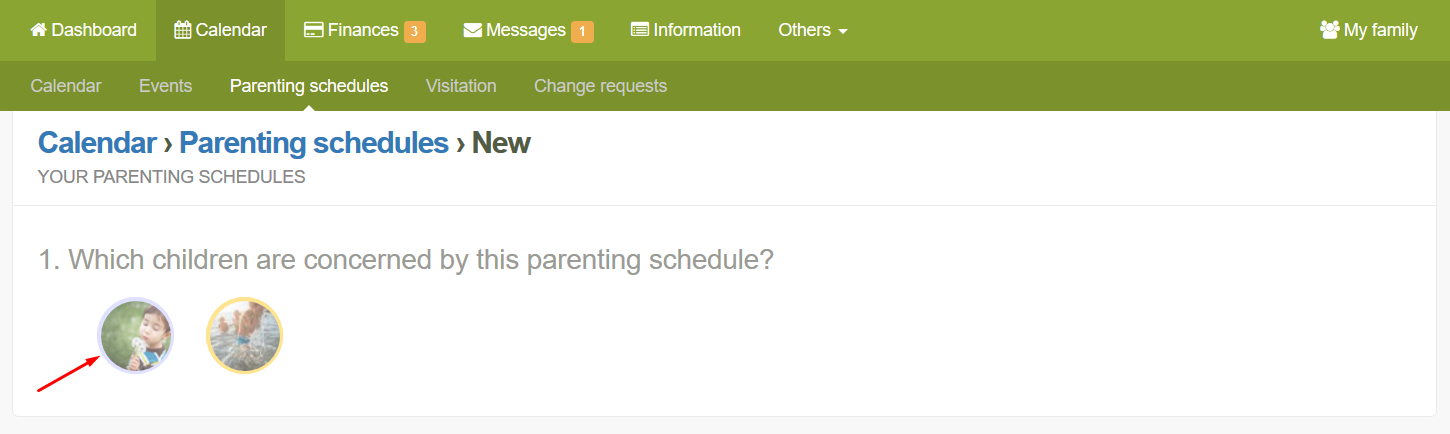
3) Select the parenting schedule model that corresponds to yours and follow the prompts. In this example, we will choose to create it manually:create a calendar


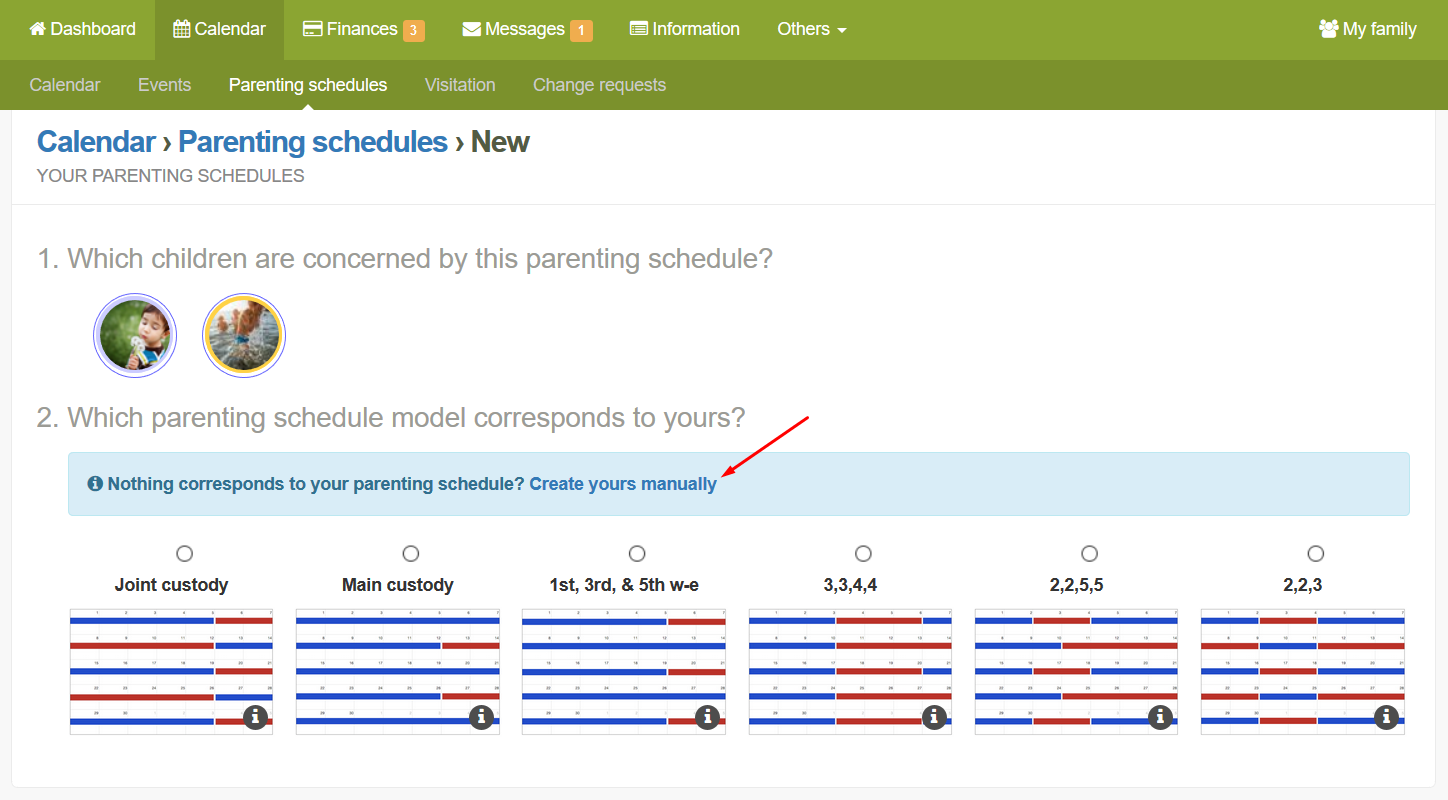
4) Choose a start date and select a date after “Repeats until…“.  Click on the first day of the week, and click on which parent the children will spend the night at. Do the same for the following days/weeks. Add a week by clicking on “Add a week” to define the second week of the custody. If your custody is defined for more than two weeks, click on “Add a week to this schedule” and configure your calendar. When all information is completed, click on “Create this parenting schedule”. If your custody is not repeating, check the box “Is not repeated and applies until….”shared parenting


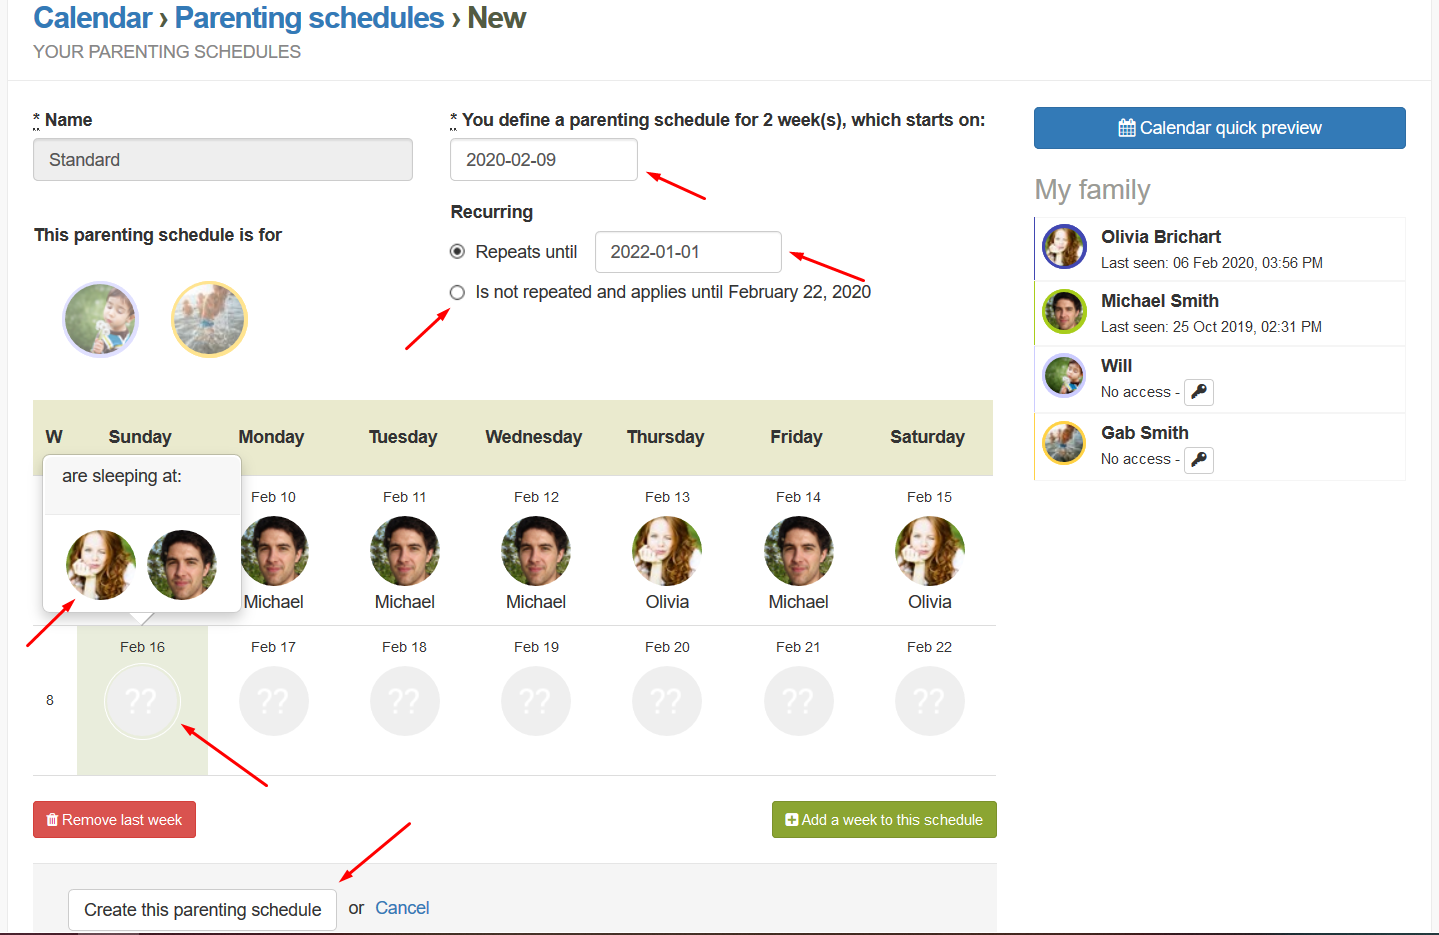
5) The system shows a list of the exchange times, when your children change from you to the other parent and vice versa. You can choose (or not) a place and time for the exchanges. If you haven’t defined any time and place, leave the box “There is no specified place and time” checked. If it’s not the case, uncheck the box and enter a place and a time for the exchanges you want. Once you’ve added places and times click, “Update exchange times and places” at the bottom of the page.exchange date and time


6)  Your schedule is now displayed in the “Parenting schedules” list. You can delete it or edit it by clicking on the pencil to the right.

The schedule is now displayed in your calendar (according to the color the users of the account have chosen).


Easy Craft for Kids – The Rain Stick

the rain stick - 2houses

What is a Rainstick ?

A rainstick is a long, hollow tube partially filled with small pebbles or beans that has small pins or thorns arranged helically on its inside surface. When the stick is upended, the pebbles fall to the other end of the tube, making a sound reminiscent of rain falling.

The rainstick is believed to have been invented by the Aztecs and was played in the belief it could bring about rainstorms. Rainsticks are usually made from any of several species of cactus. The cacti, which are hollow, are dried in the sun. The spines are removed, then driven into the cactus like nails. Pebbles or other small objects are placed inside the rainstick, and the ends are sealed. A sound like falling water is made when the rainstick has its direction changed to a vertical position.

Materials

– Cardboard tube – Scrapbook paper or wrapping paper. – Sticky tape – Scissors (be careful with kids) – A piece of cardboard – Rice or dried lentils

First Step

Start by cutting two strips of cardboard and two discs of card roughly the same size as the ends of your tube. The strips need to fit inside your cardboard tube, mine are about an inch wide. Concertina the strips of cardboard.

Second Step

Place one card circle over the end of the tube and tape it firmly in place.

Third Step

Turn the tube over and push the two strips of card into the tube and pour in the rice or lentils (the bigger the grains the bigger the “rain”)

Fourth Step

Place the other card circle over the open end and tape in place to close the tube.

Read more


Friday Craft: Eggshell Mosaic

eggshell mosaic DIY - 2houses

So it’s been a couple years I think since I did a Friday Craft post! Planning for specific crafts is not a strong area for me. I am much better at fostering an environment that promotes and provides for creativity, and my children are constantly crafting on their own. But, there is something to be said for a craft orchestrated by mom, and enjoyed by the whole family. I do have quite a few crafts in the queue right now, most of them at Larkspur and Keats’ request. So, it may be that I bring back Friday Craft posts here and there.

First step: Break the eggs

We got the idea to make eggshell mosaics from Emma Hardy’s Green Crafts for Children. However, I tend to take most craft ideas and transform them into an activity that focuses more on the process than the product.
We began by saving eggshells for a few days, washing them, and letting them dry.

Second step: Color the broken eggs

While we could have made natural dyes and added another dimension to this project all together (see my article on natural egg dyeing in Bamboo magazine’s Spring 2011 issue HERE), we chose to dye our eggshells with food coloring. (no exact measurements, just enough to richly dye the water. I added a splash of vinegar to each jar too which was probably unnecessary.)

Everyone took turns adding eggshells to the colored water and then we let them sit overnight (longer than necessary.)


Read more…
By Ginny for her blog gsheller.com

How to display a rapport by category or by period of my expenses

rapport by category or by period of my expenses 2houses

Now that the 2houses new version and its amazing new features are out, we will introduce some of the main new ones here to make sure this new version is no longer a secret for you. Today we’re going to introduce one of the features that many of you asked for, the display of report by period or by category!

How to do so ? Just follow the steps:

1) To start, click on “FINANCIAL” in the upper menu, then “Expenses” in the black menu and then on the right side bar, you’ll find two options for your report : a report by category by clicking on “report by category” or report by period by clicking on “report by period

2) If you chose a report by category, the system will generate a pie-chart report and will display the percentages by category. You’ll be able to filter your expenses by children, parents and by period in the menu at the top of the pie-chart.

Under the pie-chart report, the system also generates a list of your expenses by category. You have the possibility to export your expenses in .pdf format or .csv format by clicking on “Export” at the top of the list, and choose one of these two formats.

3) On the right menu, you have the possibility to display a report by period. To do so, click on “report by period“. The system will generate a bar chart report with your expenses of the year with the amounts link to each category. You can filter them by children, parents and  choose to take into consideration expenses not approved and pending or not by ticking or not the box in the filter menu.

4) Under the bar chart report, the system generates a list of your expenses by month. You have the possiblity to export your expenses in .pdf format or .csv format by clicking on “Export” at the top of the list, and choose one of these two formats.

And that’s all! You can now display a report of your expenses and export them! Your financial management is easier than ever!